June 18, 2018 4 min read

We often get asked for advice on how best to install our mural wallpaper. We've put together this step by step guide to help you with helpful tips and tricks.

In the guide below, we tell you what you'll need, getting started and how to install the first panel and line it up and then how best to move on to the additional panels.

Finally we give tips on how to trim and fine tune.


Before you begin

  1. Please read these instructions carefully before you start to install your wall mural.
  2. Please check your mural carefully before proceeding
  3. We recommend that two people install this mural together to help achieve the best results.
  4. Please ensure the wall is properly prepared before commencing your installation


What you'll need

  • Tape Measure
  • Drop sheet
  • Bucket of water
  • Wallpaper smoother
  • Wallpaper Seam Roller
  • Damp cloth
  • Spirit level
  • Plumb line
  • Stanley Knife / Cutting Knife
  • Straight edge (for trimming)
  • Pencil


Step by Step

1. Getting started

Please ensure your wall has a smooth, clean and dry surface that is free from any fixtures. If your surface is dry and absorbent, you may need to paint it or seal it with a water based primer-sealer.

The wall mural is supplied in ‘drops’ normally of approx 1metre wide. Carefully unpack each of the ‘drops’and lay them out in order.

2. Installing the first drop

Getting the first drop in place correctly is the key to a successful installation. Choose whether you prefer to start with the far left or far right hand panel.

*IMPORTANT - we have added 30mm to each edge to ensure your mural will cover in case your wall isn’t quite plumb.  This extra bleed must be positioned outside your wall to make sure everything is in the right position.

3. Draw vertical line

Start by measuring the width of the first drop. (Don’t forget to allow for the 30mm bleed when working out this measurement.)  

This measurement can be used to draw a vertical line, using your spirit level or a plum line, from the edge of the wall. This will ensure that you install your first drop in a perfectly vertical position.


4. The 1st panel

  • Lay your panel on a clean ground sheet image side down.
  • Using a spray bottle with a fine mist work quickly spraying the whole surface of the prepasted backing. Make sure the you have covered the entire surface evenly and liberally.
  • “BOOK” the panel (figure 3) to allow it to relax before hanging. Fold the glues side against itself 

    Booking a panel - hanging mural wallpaperIMPORTANT:

    Avoid creasing the paper when booking it is not necessary for the booked panel to lay flat. The booked strip will have graphics on both sides with the glue in contact with itself. The panel should remain booked for 1 minute.


  • Unfold the top half of the drop and apply the panel to the wall sliding the panel into position so it meets your vertical guideline, with the extra bleed to the top, bottom and side, running over the edges.
  • If you need to re-position it is easier to pull bottom half of drop away from the wall re-position the top then let the bottom fall once you are in line.
  • Using a wide squeegee or wallpaper smoother (available at most home decor and hardware stores) gently press your panel against the wall, starting at the top. Continue with this to gently smooth out all the major bubbles and wrinkles without applying too much pressure. Too much pressure will squeeze the glue out. Don’t be alarmed if there are small bubbles still visible while paper is wet these will disappear as the paper dries.

Tips:-

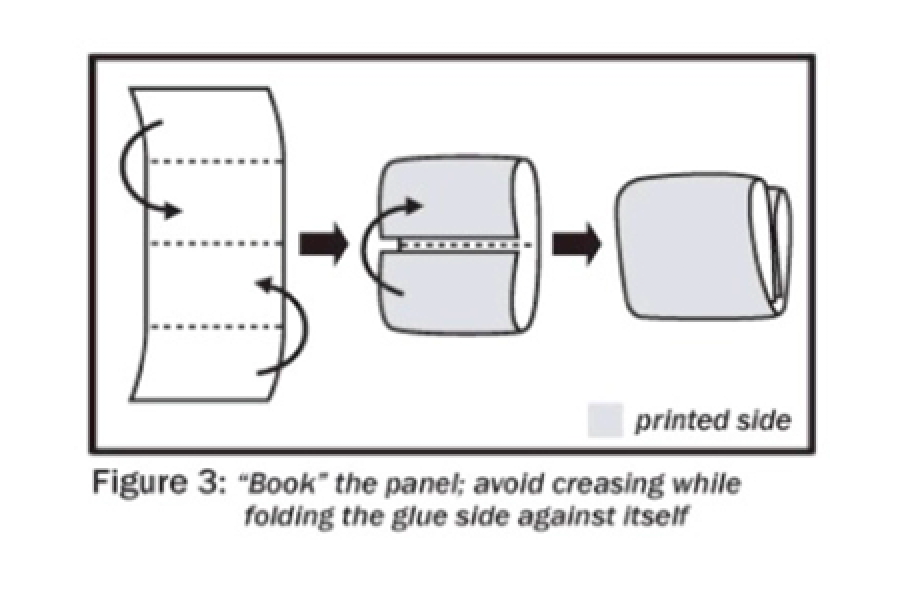
Because the paper is pre-pasted be careful not to wipe glue off the edges.


5. Additional panels

  • Apply the second and subsequent panels, ensuring the pattern or image matches up ( Remember that the panels don’t butt up but have an overlap of 10mm )and that the appropriate amount of bleed runs over the top and bottom edges.
  • Generally the overlap is not noticeable but if it’s important for your mural to butt fit then the overlap can be trimmed out once the paper is installed
  • Repeat as per your first panel overlapping the first panel and gently sliding the panel into position making sure the pattern or image lines up
  • Follow the same process of smoothing the panel, ensuring this is done very gently.
  • Continue to apply all panels before installing the last panel, which should be your far left or far right panel, depending on which side you started.


6. Trim top, bottom and sides

When all panels have been adhered, carefully trim the top and bottom of your panels plus the far left

and far right sides, using a straightedge. Don’t rush this and ensure you have sharp blade to achieve the best results.

7. Fine tuning

If required, apply a small amount of paste or adhesive between any joints that need it to prevent curling or to edges to make sure the mural is fixed to the wall surface.


8. The final very Important step

Stand back and admire your wall. If you have any questions, please give us a call anytime. 


Do you have additional tips?

If you have any additional tips that you think others would find helpful, please email us and we'll look to add these tips to our list.


Send us a pic!

We would also love you to send us a photo of your Mural installed. Send any pics to us. We'd love to see them.

Relda +64 21 666 290 | Email: relda@backtothewall.co.nz 
Jo +64 27 611 6144  | Email:  jo@backtothewall.co.nz

Back to the Wall